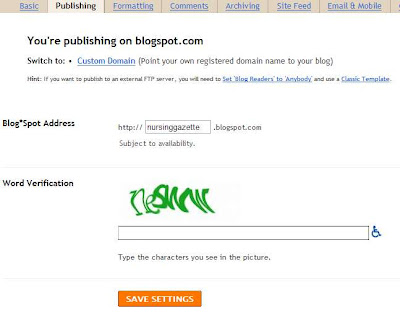
Now, let us head for Publishing Settings. From Blogger Dashboard, go to Settings, then click on the Publishing tab.

See the picture above, this is how the Publishing Settings looks like.
Changing Subdomain name
The default Blog is always published on Blogspot.com. For example, you pick "myblog" for your blog's url address, then your blog address will be http://myblog.blogspot.com.
You can change your blog's subdomain name anytime you like. To do it, simply change the Blogspot Address to another one (see picture above). After doing this, verify by typing the exact letters found on the picture, into the verification box below. Then, click on "Save Settings".
Note that the word verification system is case sensitive, meaning, if you see it in small letters, type in small letters also.
Switching to a custom domain
To switch into a custom domain (ie. .com, .org, .biz, etc.), you need to set up your custom domain settings first.
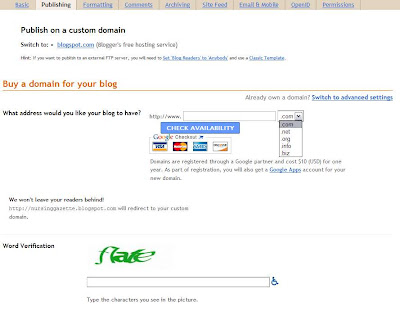
To setup your custom domain, click on the Custom domain link. (see picture above) This will lead you into the custom domain setup page.
Buy a domain for your blog

Here (see picture above), you can directly get a new domain. Just simply type the domain name of your choice, then select your domain type (.com, .net, .org, .info, and .biz). After that, check for availability. If your domain name is unique, you may continue with the registration, otherwise, you may have to choose another name.
Google will endorse you to one of its domain and host providing partners (GoDaddy, Enom, etc.) As part of your registration, you will also get a Google Apps account for your new domain.
Once you have completed the registration, your blogspot subdomain will no longer show your blog, instead, it will show a redirect so your visitors could track your blog to the new domain.
However, if you already have a domain, and you want to transfer your blog into that domain, click on the "Switch to advance settings" link. You can find it to the upper right of the domain form. (see picture above)
Use an existing domain

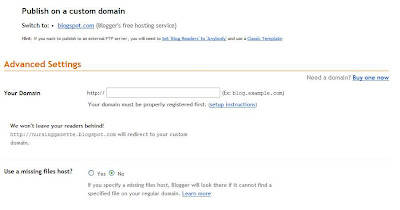
Here, you are given the option to transfer your blog into an already existing domain. Just enter the registered domain's name on the blank. See setup instructions for more info.
Your domain
This is the field where you need to input your existing domain's name.
Use a missing files host
This option if set to yes, will give you an option to assign a fallback server whenever someone tries to access a file that cannot be found on your blog. For example, let's say someone clicks a link to www.yourblog.com/sample.jpg, but that file doesn't exist. If you have specified www2.yourblog.com as your missing files host, Blogger will automatically look for that file on www2.yourblog.com/sample.jpg and will try to use that instead.
Once everything is set, verify the change and save the settings. Your blog will show a redirect to the domain you had set up. You can also use this feature to turn your blog into a redirect for other sites.
That ends our tutorial for now. Our next tutorial will be about Formatting Settings..


No comments:
Post a Comment
You are allowed to post a signature on your comment, just please don't spam.